Exposure Reloaded
The Exposure Triangle Reloaded
Now that we’ve explored ISO, Aperture, and Shutter Speed separately, let’s revisit how these three settings interact — and how you can make them work together for your everyday photography.
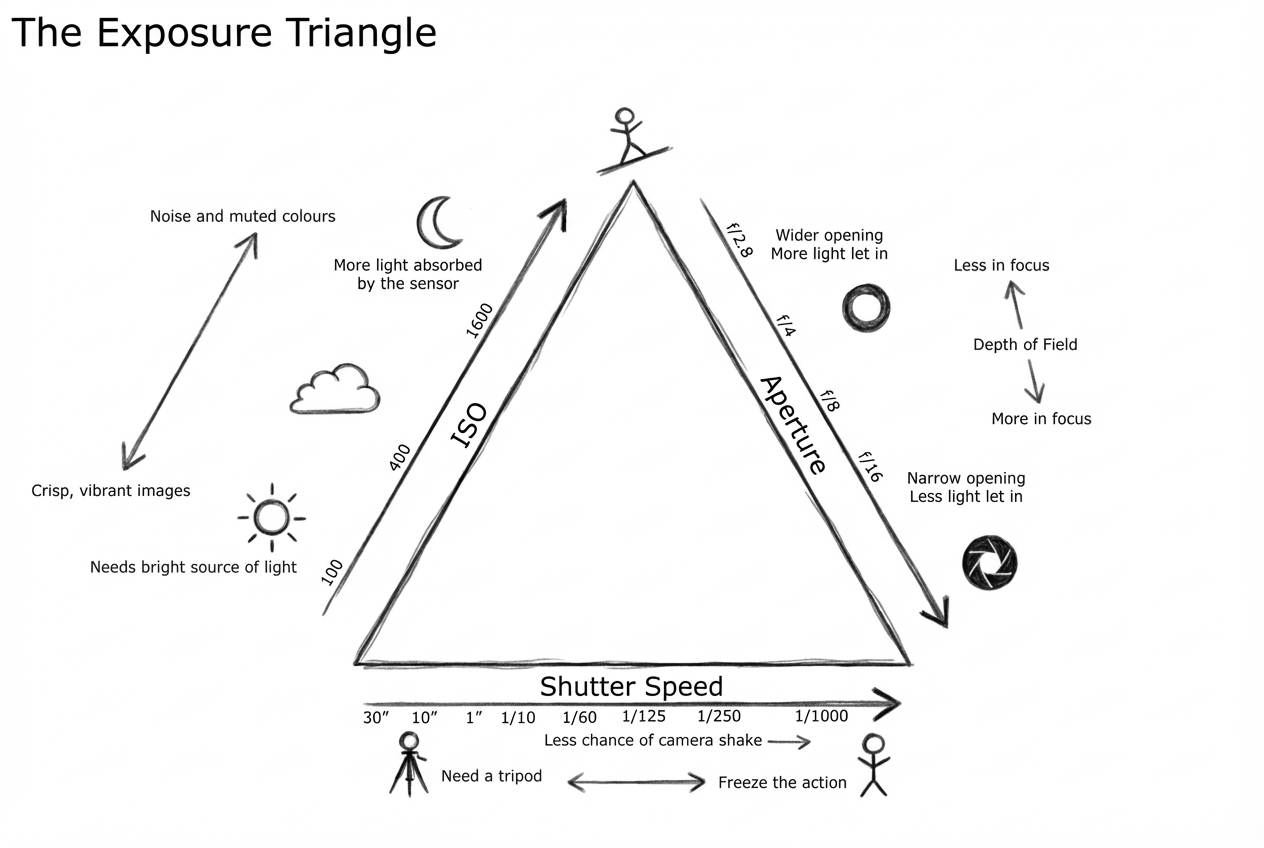
ISO
ISO controls how sensitive your camera’s sensor is to light.
Higher ISO values make the sensor more sensitive, which means you can shoot in darker conditions. The drawback is increased noise, which can make your images look grainy or less clean.
So, in most situations, aim to use the lowest practical ISO for the light you have.
Aperture
Aperture is the size of the opening in the lens. A wide opening lets in more light; a narrow one lets in less.
Aperture is also one of your most powerful creative tools. It controls how much of the scene appears in focus (depth of field):
• Narrow aperture (big f-number like f/16) → most of the scene in focus
• Wide aperture (small f-number like f/2.8) → shallow focus, blurred background
Using a wide aperture is a great way to make your subject stand out against a softer, less distracting background.
Shutter Speed
Shutter Speed is how long the sensor is exposed to light.
A slow shutter speed gives the subject (or camera!) more time to move, creating blur. This can be wonderful for creative effects — flowing water, moving crowds, spinning wheels.
Most of the time, though, you’ll want sharper images, so you’ll use faster shutter speeds to freeze motion.
It’s a balancing act
Here’s my general approach — not a strict rulebook, just a reliable starting point. Try it, adjust it, and build your own style on top of it.
My Technique
-
Set your camera to Av mode.
You choose the Aperture (and ISO), and the camera automatically calculates the Shutter Speed. -
Choose your ISO based on the environment.
• Indoors: around ISO 1600
• Outdoors on a cloudy day: around ISO 400
• Bright sunny day or beach: ISO 200 -
Choose your Aperture for creative control.
• f/4 is a good start for still or slow-moving subjects.
• f/8 works well for larger or faster‑moving subjects (the wider depth of field gives you a bit more “wiggle room”). -
Now check the Shutter Speed.
Frame your subject as you want it, then look at the speed the camera has chosen. -
Is the Shutter Speed too slow?
If it’s below 1/100 (or whatever minimum you’re comfortable holding steady), increase the ISO to speed things up. -
Is the Shutter Speed very fast?
If it’s above 1/1500, you can probably afford to lower the ISO. This reduces noise and keeps your image cleaner.
And that’s your balance
With ISO and Aperture set thoughtfully, the camera will give you a usable Shutter Speed — and you maintain creative control.
These numbers are only guides. As you experiment with different conditions and subjects, you’ll quickly learn what works best for you. It might seem like a lot at first, but remember: photography is part art, part practice. The intellectual bit becomes instinctive with repetition.
Keep shooting, keep playing, and muscle memory will do the rest.
“The single most important component of a camera is the twelve inches behind it.”
— Ansel Adams